Outstanding RUX Waterproof 25L Bag

A couple months ago I acquired a new waterproof tote bag, the RUX 25L Waterproof Tote bag. I’ve been using this bag for a while now and I will tell you that I absolutely love it. Before I get into the details of this bag I will tell you that I own and have tried out two or three RUX products, one which I’m ambivalent about and another that I’d give a thumbs up to. So I’m somewhat familiar with the company, and I like what they do, even if not everything the produce fits my personal needs (that is not to say that they are not high quality across the board, because I have found that they are indeed high quality items, but not everything fits each individual’s needs perfectly, which is as it should be). But this tote bag has become a staple piece of gear that I now would hate to be without whenever I camp or fish. It is outstanding.
Here’s why I love it. The RUX Waterproof Tote is exactly what it claims to be: WATERPROOF. That feature has come in handy so many times for me, especially when I’m out on the boat and it starts to rain, which has happened more than I can say. I fish in all kinds of weather, and I enjoy fishing in a light rain. A few times I’ve been out and a light rain has turned into a downpour, so much so that I’ve had to pull into shore at least twice to wait it out. And even though I’ve had a raincoat on, my legs and the boat would get pretty well soaked. But whatever I had in the RUX Tote remained dry.
Most often I carry a spare set of clothes and lunch in the bag, just for instances like those I just described, and I was able to change into dry pants and socks, eat my lunch, and even have a cigar from the bag that was still dry. When the weather begins to turn sour I place my cell phone in the RUX as well. One time I used it to haul and store camera gear that I didn’t want to risk getting wet. But if being waterproof was its only feature you could just use ziplock bags for a lot of things. It has other advantages besides that. A big one for me is that it sits squarely, like a tackle box, in the bottom of the boat. I’m kind of an organizational freak, and I like my boat or surrounding area to be functional and neat, with everything squarely in its place, and the fact that it’s a flat-bottomed bag that sits like a box appeals to my sense of organization.
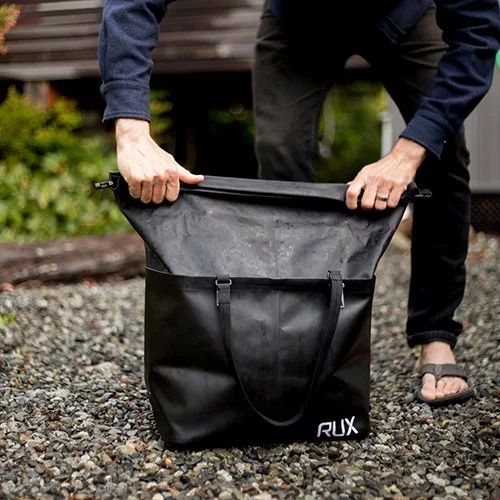
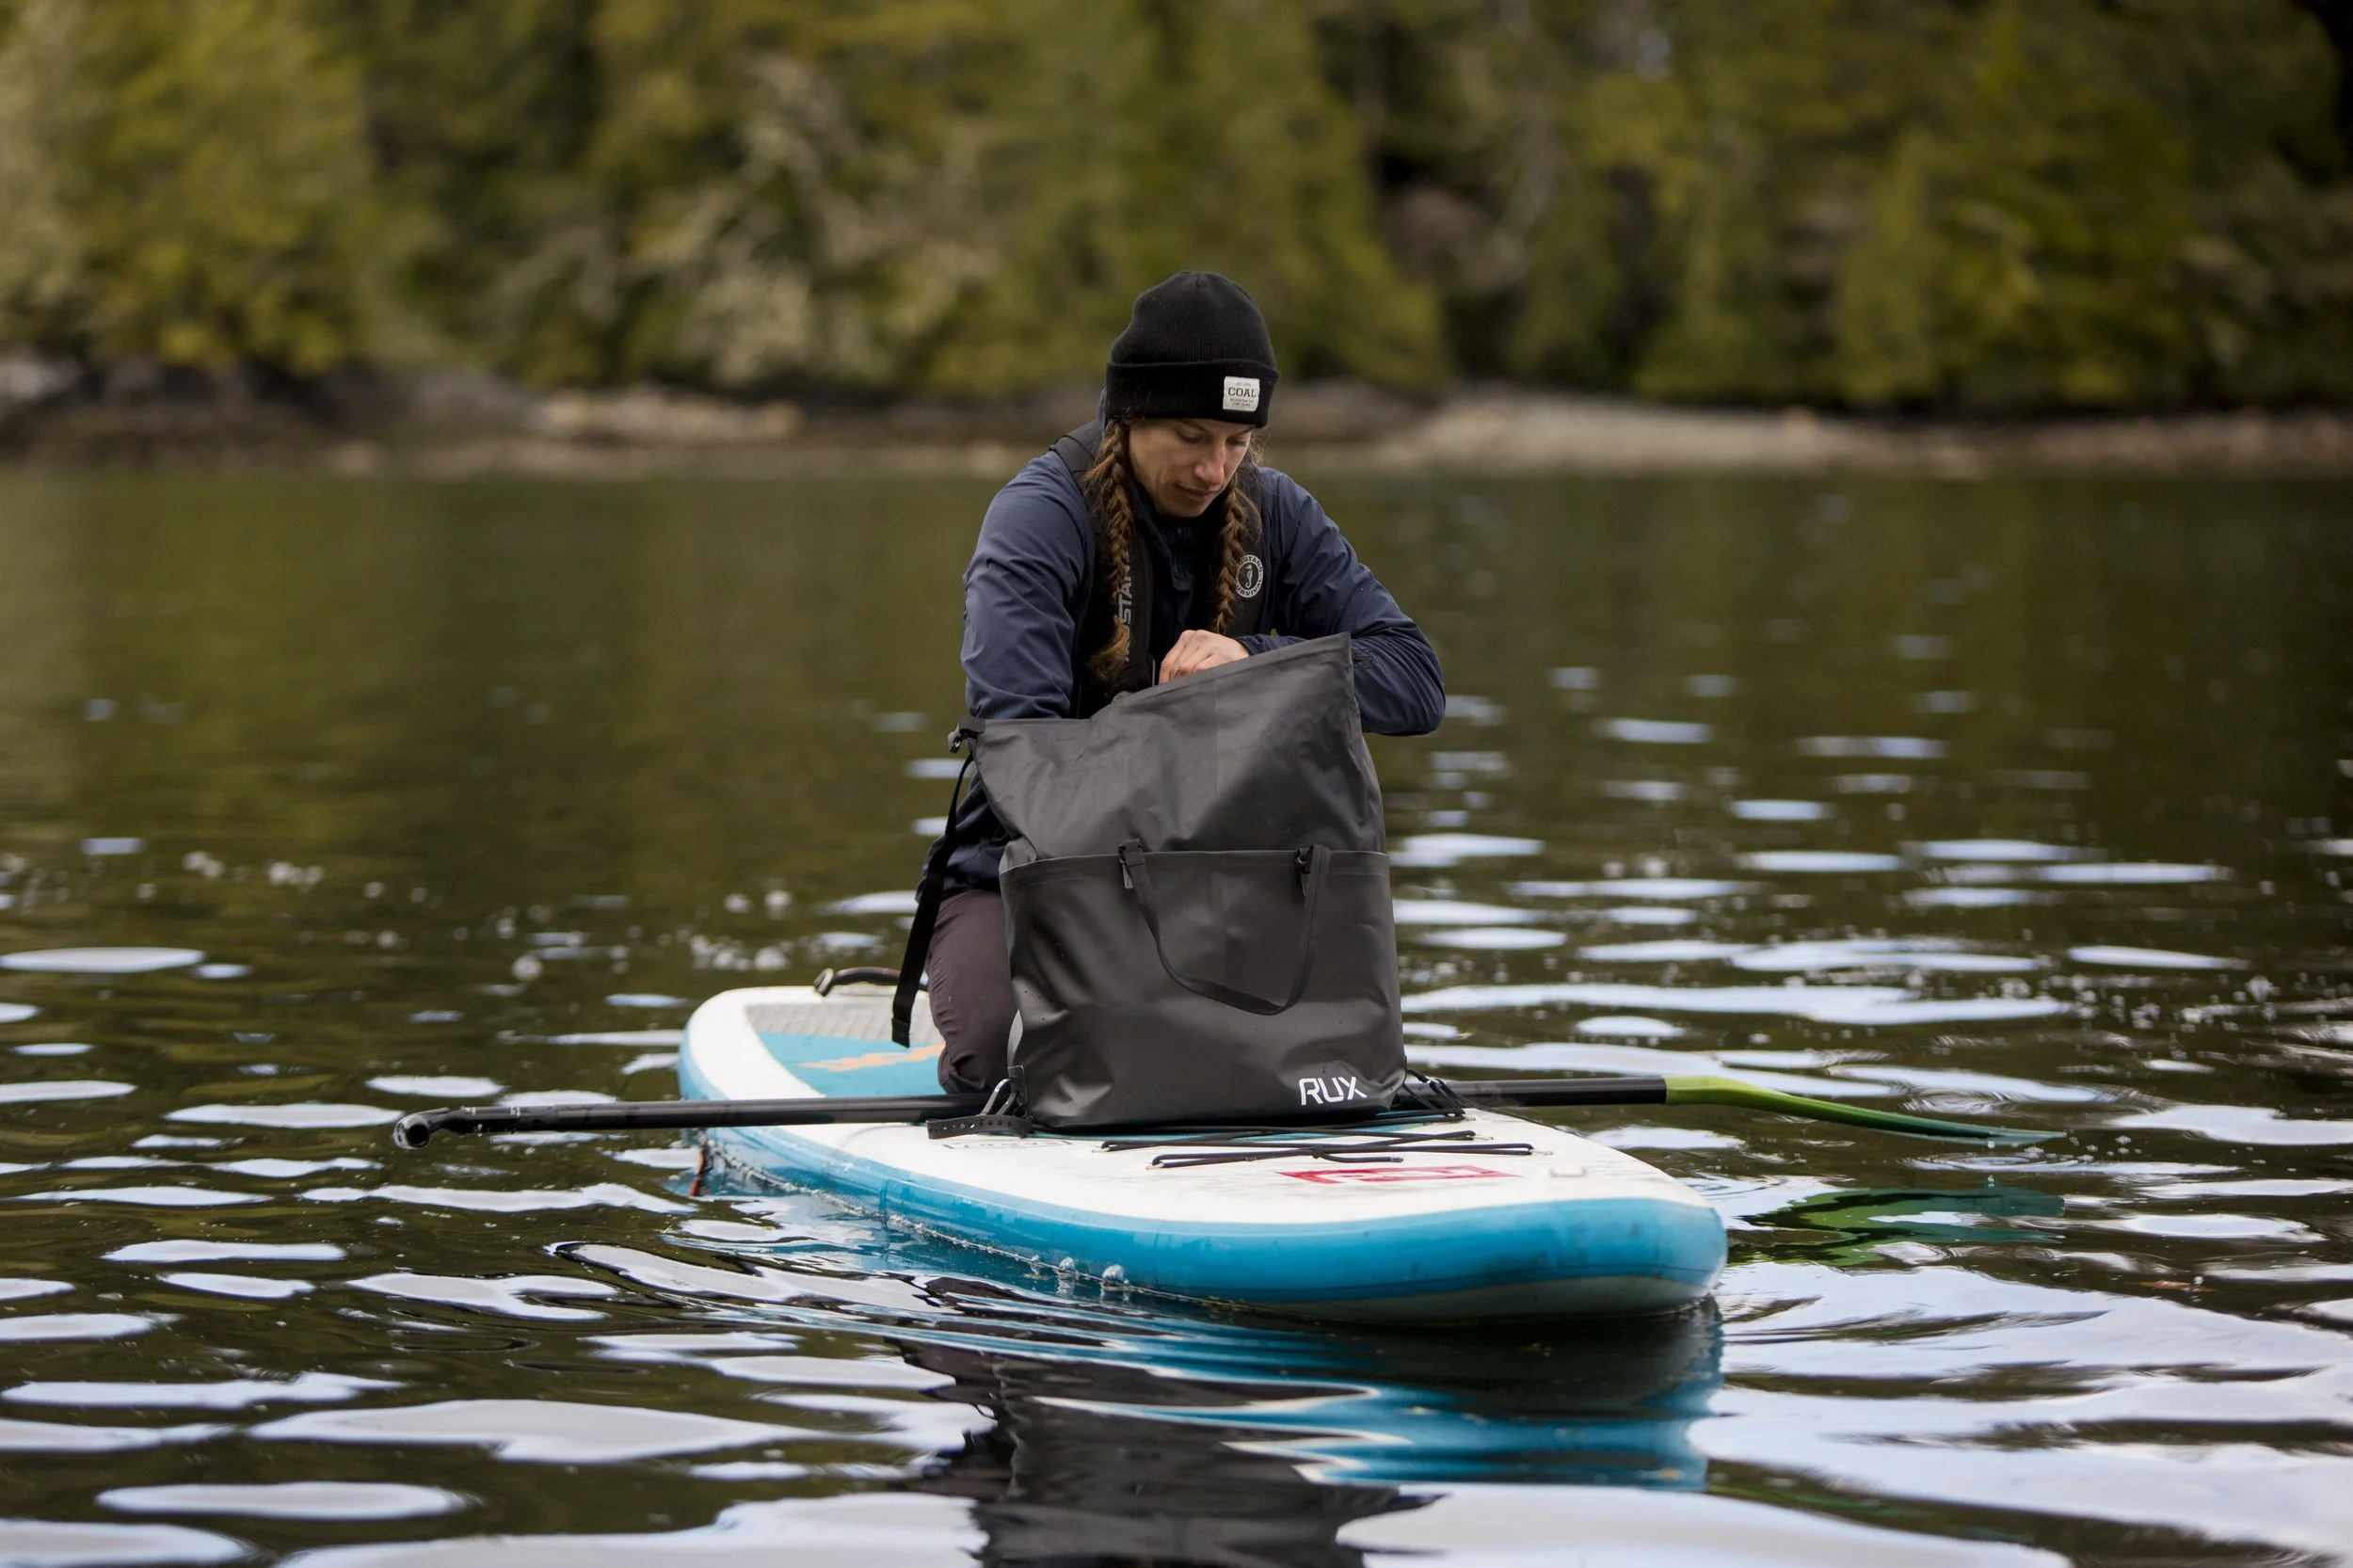
It’s also constructed of thick, heavy duty material. No wimpy sidewalls or exterior here. You can set it on the wet ground or in the bottom of a wet boat without fear of water seeping in anywhere. The interior is made to function like a dry bag, with two snaps that you click together after rolling the top, followed by two more exterior snaps at the top of the bag. This is super convenient, quick to close and open, and ensures that whatever you have inside the bag stays dry. The 25L size is just about ideal as well, at least for my purposes. Finally, it has handles that allow you to carry it like a suitcase, and a shoulder strap so you can swing it over your shoulder and carry other things in your hands. In short, some thought and planning went into the design of this bag. While I have no complaints, one thing I would consider upgrading if I were RUX is that I’d make the shoulder strap a bit thicker. It does seem to be a tad thin. But then again, I’ve never carried anything overly heavy in it either.
Here’s the link to the RUX site so you can check out this bag, as well as other RUX products that may suit your needs or lifestyle. For me, this is a definite winner. At first blush it seems a little pricey, but I’ve ended up using and relying on this bag so much that to me the price is justifiable. Plus, it’s got a lifetime warranty.


Uncle Josh 1977 Catalog
This piece was first published on Bass Fishing Archives on July 2, 2023.

Uncle Josh 1977 catalog cover.
Uncle Josh Pork Rind Baits were popular for decades. Actually, it would probably be more accurate to say they were popular in streaks, rising and falling, and rising and falling again, in popularity over the course of their 100-year tenure on the sport fishing scene. This catalog is from 1977, right when Uncle Josh was ready to make a resurgence following an early 1970s dry spell.
Terry Battisti writes in Pork: The Forgotten Bait – Part One, that the early 1970s pork baits “went the way of the Dodo bird,” thanks in large part to the “new plastics, alphabet lures, buzzbaits and spider jigs” that had entered the market.
But then, Battisti writes, “around the 1980 timeframe a couple of Arkansans by the name of Huland Nations and Bob Carnes changed that.”
“Actually, it was the 1977 Arkansas State Bass Tournament that got the ball rolling when Nations put a beating on 400 other entrants using what would eventually become the Jig-n-Pig. About that same time, Carnes was experimenting with living rubber (and inventing the Arkie Jig) and using pork as a trailer on his jigs. What followed was Uncle Josh, the only manufacturer of pork rind left, couldn’t keep up with demand from a four-state region of the Midwest. The pork boom was on – for a second time.”

Uncle Josh catalog pg. 2.
This catalog is dated 1977, but catalogs were generally printed the preceding year. There’s small print at the bottom of page 2 that reads, “9-1-76 1977 Prices Effective September 1, 1976” and the only mention of any tournament success is on page 9, where the text speaks of the Twin-Tails bait: “As further evidence of the Twin-Tails’ ability to draw a crowd, early in ‘73 the U3 pattern chalked up two bass tournament wins.”
It’s a good bet that had they gone to print knowing of Huland Nations’ win at the Arkansas tourney, Uncle Josh would have highlighted the win in the catalog. Maybe they did indeed do that very thing the following year. We don’t have the 1978 catalog, but if any readers do have it please let us know so that we can share it with the rest of the BFA community. It would be interesting to see just how the company responded, in print, to Nations’ success with pork bait.
The cover of the catalog is pretty great. It shows a school of chunky bass swirling about underwater while one of their number is about to strike a spinnerbait equipped with the new Ripple-Rind trailer. The text proudly declares that the Ripple-Rind was “pork rind’s answer to the plastic twisters.” Mr. Twister and other curly tail plastic lures were huge in the 1970s, and it only made good business sense that Uncle Josh would try to capitalize on that success. So they basically copied the curly tail format but in pork skin instead of plastic.
The catalog also says that the new Ripple-Rind is “the first, revolutionary change in pork rind bait design in over fifty years and a real hustler!”
They do tout what seem to be the Ripple-Rind’s legitimate advantages over plastic twister tails: “While it’s extremely flexible natural flesh, it still retains the toughness and strength of our other pork baits. It’s infinitely more durable than the plastic forms. It can’t be pulled apart. It won’t lose its hindquarters in a taffy-pull with a big fish. And, temperature extremes in fresh and salt water are not harmful to it.” No doubt the pork Ripple-Rind was more durable and tougher than plastic, which an angler surely learned first hand when he tried to remove a sun-dried pork bait from a spinnerbait hook.

Uncle Josh 1977 catalog pg. 6.
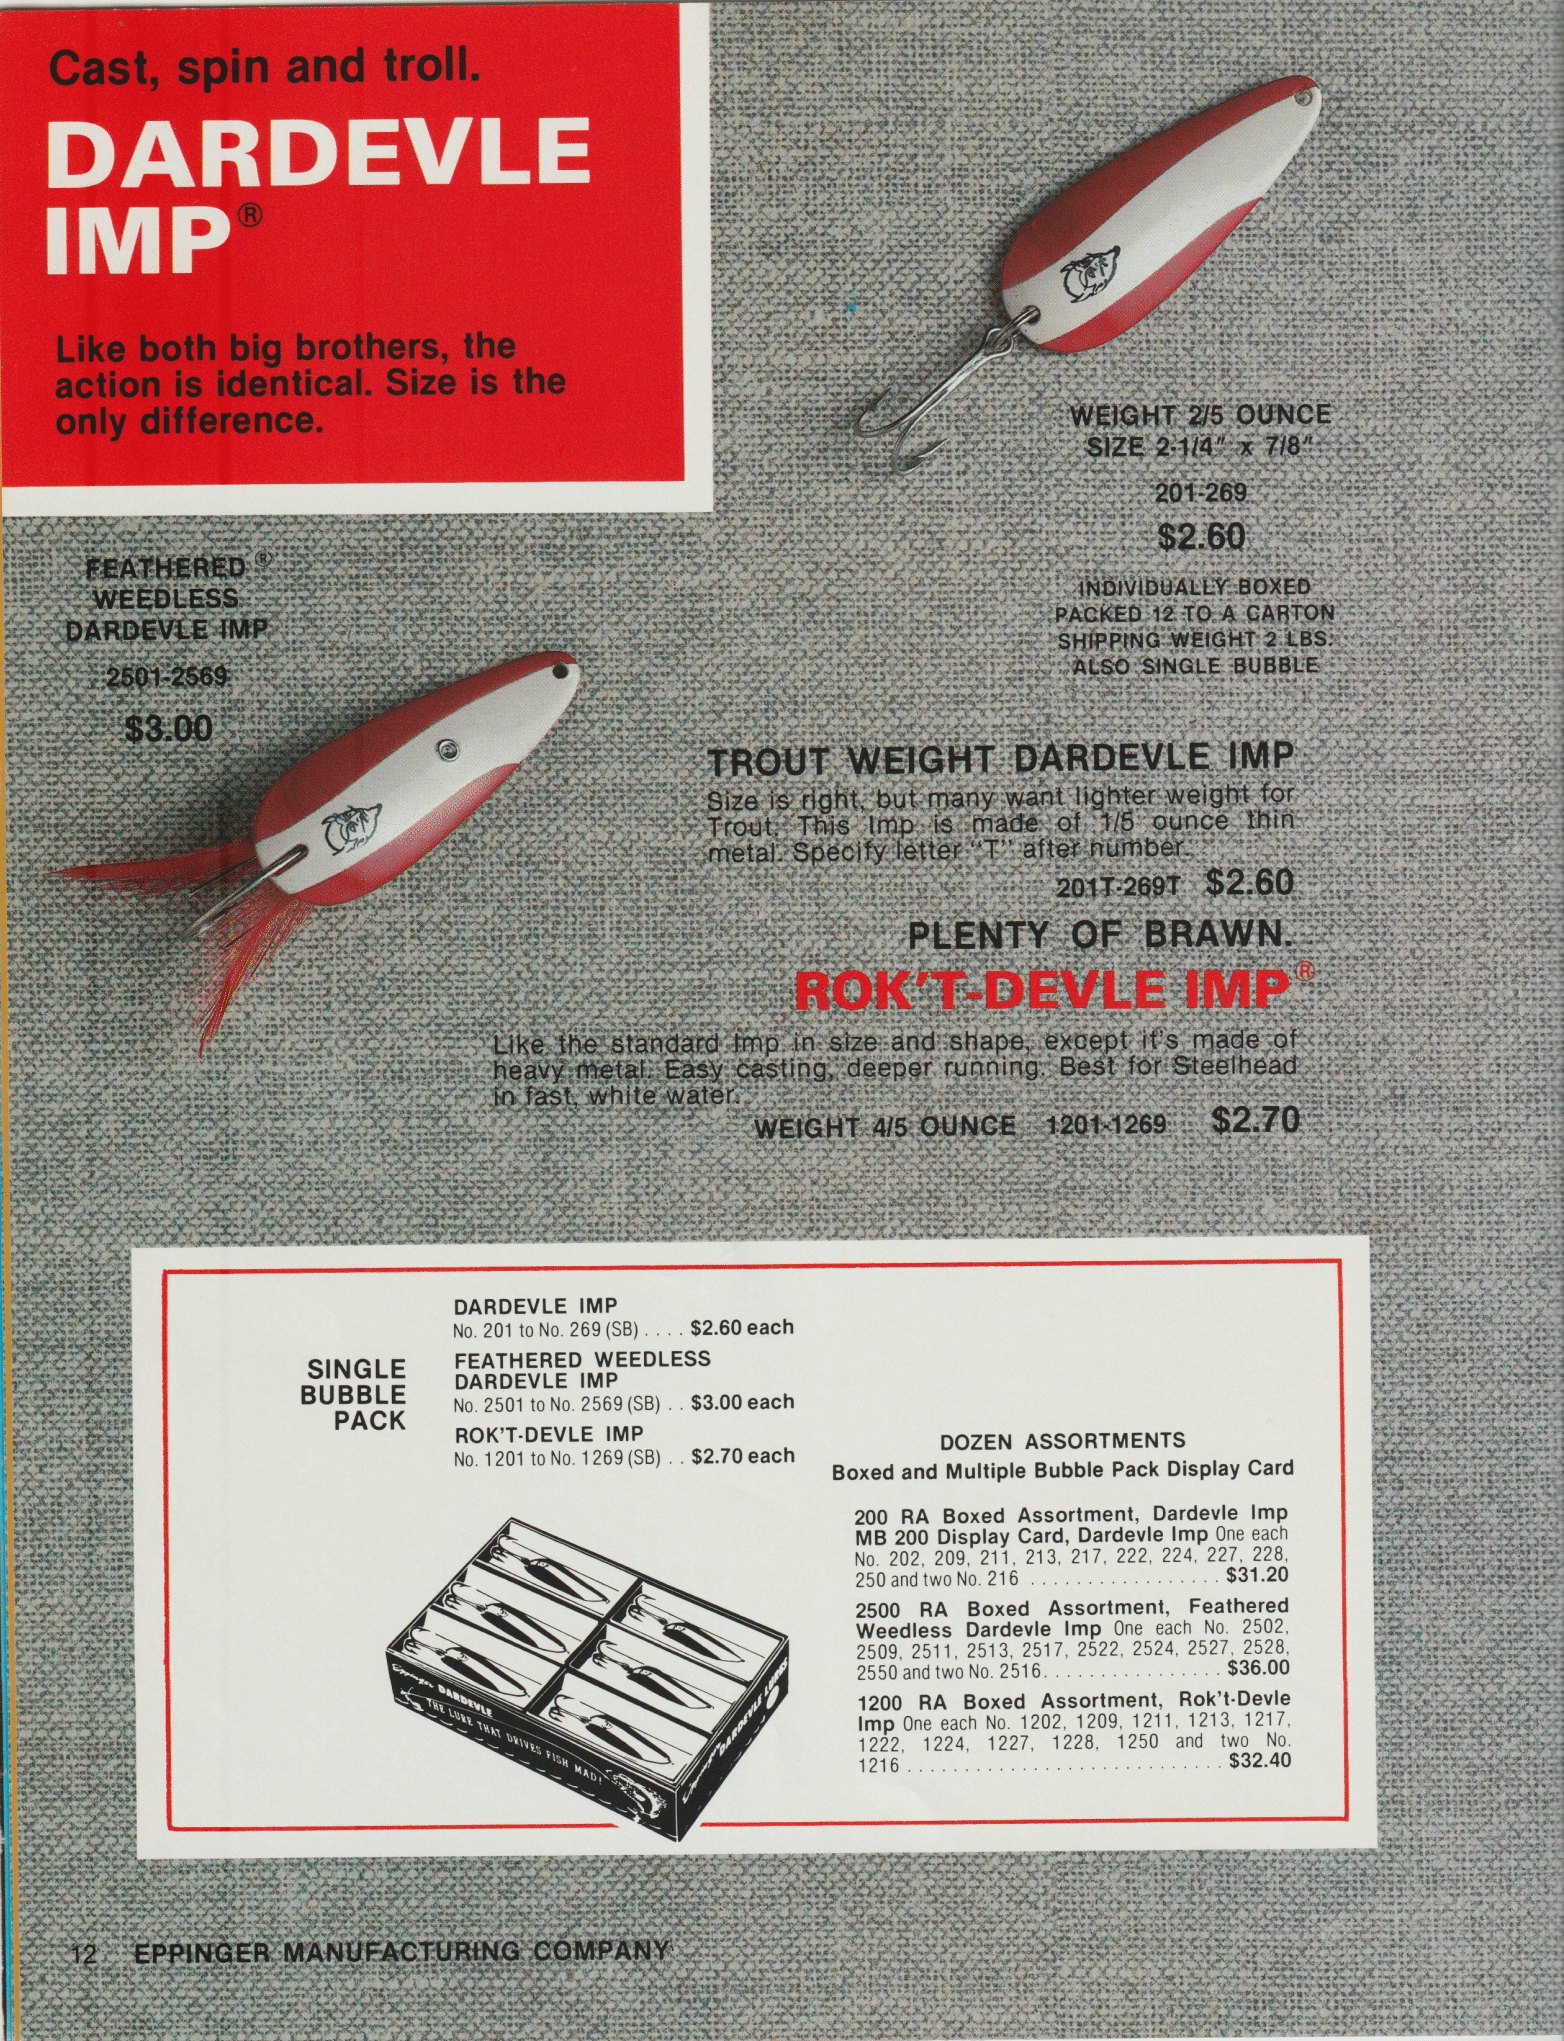
You could get 3 to 8 baits per jar, depending on size, and you were only out, according to the catalog, a list price of $1.40 per jar. Pork was an economical alternative to plastic and those prices are a far cry from what pork baits command today. Shoot, Uncle Josh made buying easy back then, because every jar of pork, regardless of bait style, cost $1.40. You could even afford to splurge and get yourself an Uncle Josh embroidered jacket patch for only $1.
The catalog is long on enticing descriptions for all of the Uncle Josh products, highlighting the features and providing how-to’s for fishing each bait. There are also pages for the company’s Spinrite, Marabou Spinrite, Bass Snatcher buzzbaits, dough and cheese baits, and a line of Salmon Egg baits with a full page on how and why to fish them.
If all that didn’t convince you to try at least some the company’s line of baits, the catalog closes with a page of testimonials from anglers who love and praise the company’s offerings.
Uncle Josh 1977 catalog back cover.
Along with the catalog came two form letters addressed to “Fellow Sportsman,” with a special offer for a combination of 5 Spinrite, Marabou Spinrite and Kicker lures for only $5. Shipping was only $1. Man, if I only had a time machine.
The entire 1977 Uncle Josh catalog is posted below in the gallery. Click on the first image and use the arrows to navigate through the gallery.
———————————————————————————————————————————————————————
Gallery – Uncle Josh 1977 Catalog


VERTX Apparel - Top Notch Winter Clothing


Right now it is 14 degrees outside. A little earlier it was 4 degrees. It’s early February in Wisconsin. I just came in from working in my shed for an hour or so, and I was warm and toasty the entire time. Reason being that I’m wearing what I can confidently declare is the warmest, lightweight jacket I’ve ever owned, the Vertx Integrity+ Insulated Jacket 2.0. I’ve been wearing this jacket almost daily from the end of November until now, and I absolutely love it. I have not had a single day where I’ve been chilled or felt like I wanted to add a layer. Honestly, I’m amazed at how this jacket has been able to keep me warm over the last couple months, in the coldest of Wisconsin temperatures, and it has been below zero several of those days.
Additionally, I have to say, I look good in this jacket! At least my wife has told me that I do, several times. LOL. But it’s true. This jacket is slimming and attractive, not bulky like a lot of the other winter coats I’ve owned. Here are a few of the other features of the Vertx Integrity+ Jacket:
* Detachable hood. I’ve never been a big user of jacket hoods. I don’t like how they interfere with my hearing. But several times this winter my wife and I were walking on one of our daily long walks, and I was wearing only a ball cap. The wind was howling and my face and ears got mighty cold, so I pulled the hood up and was immediately and pleasantly surprised at how thoroughly and effectively it cut the cold.
* Elastic wrists. The inside half of the wrists are a dark elastic material. This is super nice for keeping the cold out and for making a nice tight, comfortable fit.
* Inner breast pocket. The inner breast pocket has a vertical zippered closure and it’s where I keep my wallet. It’s convenient and easy to access.
* Light weight. The Vertx Integrity+ Jacket weighs almost nothing. While writing this I was curious just how much it weighed so I weighed it on my postal scale. It weighed around 21 ounces, less than a pound-and-a-half. Unbelievable, especially given how warming this coat is.
* 37.5 Technology - if they made gloves out of this material, I’d definitely have a couple pair. A word about 37.5 Technology; I got this off the thirtysevenfive.com website: 37.5 Technology incorporates porous volcanic minerals and activated carbon derived from coconuts into the fabric. So, it’s natural. Now this next part is, to me, a little weird. The temperature regulating material absorbs infrared (IR) energy that your body naturally emits, and this in turn activates the particles mentioned above to speed evaporation and remove humidity. I have no idea what this really means, but the gist of it is that the 37.5 technology doesn’t simply move moisture away from your skin, like in garments that using wicking technology to keep you dry, 37.5 tech actually removes moisture.


If you go to the 37.5 website you can read and watch a couple videos about how this tech was developed. It’s interesting because it has to do with volcanic sand baths and a photo-physical chemist. It’s nerd stuff, so I won’t share it here, but if you’re into that sort of thing, like me, please check it out. I don’t know about copyrights and proprietary rights on this stuff, but I’m guessing that this 37.5 Technology will at some point become the standard fabric technology for cold weather garments.
The 37.5 folks also seem to be very conscious of environmental issues concerning the manufacture of their products. Their website says that their products are designed to “break down to naturally occurring materials over decades.” There’s a lot of info on the website that talks about their commitment. I don’t know about you, but that’s become a much more important issue to my wife and I (and our daughters). We’ve become pretty skeptical of actions like recycling (from what I understand, damn little of the things we put in the recycling bin actually get recycled), so it’s cool that companies try to make things that more easily biodegrade when they get thrown out. I’m waiting for natural materials to replace plastic in a lot more commercial items. We’ve switched from plastic to glass in as many things as is practical, and we try to avoid plastic as much as we can. I am by no means a global warming zealot - I have been very critical of that scam for decades, from back in the 1970s when they first tried to convince us that the earth was heading into an ice age. In my opinion, the global warming narrative is hogwash. But I am firmly anti-pollution and pro-wilderness. Anything we can do to cut down on our waste and improve the biodegradation of commercial products gets a big thumbs up from me. Okay, sorry for getting on my soapbox there…back to the Vertx jacket and base layers.
I really can’t say enough about the quality and warming ability of this jacket. Again, it’s the best winter jacket I’ve ever owned. Cost is $200, which seems a little pricey, but it’s well worth the price. Honestly, I’ve pretty much relegated all of my winter jackets to the closet every time I go out, with the only exceptions being my ice fishing float jacket and a gnarly, dirty barn jacket I use when doing dirty yard work like cutting trees.


Now then, I’ve also been periodically trying a couple of other pieces of Vertx apparel, the hooded Merino Wool Base Layer Hoody base layer and the Merino Wool Base Layer Pant long-johns. These employ the same technology as the Vertx jacket, and since they are right next to the skin the 37.5 tech seems to me to be more important and more practical. These are brilliant underlayers. They’re lightweight, comfortable and you hardly know you’ve got them on. Both pieces are not only comfortable and warming, but after wearing them all day long, for multiple days in a row, they remained odor-free and “like new” in composition. The odor-free part is impressive; the company website says that the garment’s “natural minerals trap odors and release them in the wash,” and those minerals apparently don’t degrade like other fabrics that use regular wicking technology. I really can’t say if the stuff 37.5 says is accurate or if it’s just a sales pitch, but what I do know is that these garments work extremely well, remain odor-free after repeated wearings and are darn comfortable.
Another thing I noticed is that they maintained their integrity and “like-new” form. By that I mean that a lot of underlayers, especially those with cotton or mixed composition, tend to get saggy and stretched in certain areas. The Vertx underlayer pieces were pretty much unchanged and comfortable from the first day I put them on. The merino wool pants underlayer also have a couple of hip pockets. I haven’t used these but it’s a cool idea, especially if you are prone to walking around in nothing but your long-johns.
I’ve become a huge fan of this material. It’s extremely lightweight and is unbelievably warming for its weight.


As I look over my post here, I see that I’ve written a pretty lengthy review. That’s okay though, because I have become a true believer in these clothes - the jacket and the underlayers. I also got a couple pair of Vertx pants that I haven’t yet had a chance to wear much to get a feel for how they perform, but I’ll get to those at a later date. I’m expecting good things though, given how impressive the Vertx Integrity+ Insulated Jacket and Merino Wool Base Layers performed. I’m a die-hard Duluth Trading Company man when it comes to pants - their firehose pants are about the only thing I wear - so I’m excited to give the Vertx pants a good trial. Until then, I can confidently recommend you go to the Vertx website and get yourself an Integrity+ Insulated Jacket 2.0 and a set of Merino Wool Base Layers, top and bottom. It might cost a chunk of change, but in my opinion, it’s money well spent. And Vertx seems to have some fantastic sales going on periodically. Just this morning I went online and saw that they had some monster sales on for several items, and I purchased their Integrity P Jacket for only $46 plus $10 shipping (regular price is listed at $191).
Eppinger Dardevle
This piece was originally published on the Bass Fishing Archives site on April 23, 2023.
Cover from the Eppinger Good Fishing booklet, c.1934. Source: Terry McBurney article in June 2007 issue of NFLCC Magazine.
There is arguably more product turn-over in the fishing lure business than in almost any other business. Lures come and go with a frequency seemingly only rivaled by products in the tech industry. Companies are built and companies die on the altar of new fishing lure innovation (or reissues of old fishing lures with minor tweaks). But some lures have proven to stand the test of time, and have remained largely unchanged practically since their creation. The Eppinger Dardevle is one of those lures.
The Dardevle has such an enduring legacy and is such an iconic fishing lure that the name Dardevle has come to signify just about any and every teardrop-shaped metal spoon, often with a red or black colored body with a curved white stripe down the middle. “Dardevle” has become the generic term for countless imitators in much the same way that Band-Aid has come to signify any small adhesive bandage or ChapStick substitutes for any brand of lip balm. There are a lot of great brands of Dardevle-like spoons on the market, and almost all of them are effective fish catchers to varying degrees. But frankly, in my opinion, there’s really only one true Dardevle, with the heft, precision and specifications that make it the number one reliable, go-to spoon that consistently outfishes every other spoon on the market, and that would be the original Eppinger Dardevle.
Vintage Dardevle Color Selector Chart. Source: NFLCC website.
The Dardevle story has been expertly documented by Terry McBurney in his June, 2007 article, “Lou J. Eppinger,” for the National Fishing Lure Collectors Club Magazine. McBurney covers just about every base of the Eppinger story, from Lou’s growing into and taking over a taxidermy studio at the age of 18, to him taking $25 to purchase some fishing supplies to sell when the taxidermy business was seasonally slow. As it specifically concerns the development of the famous Dardevle lure, McBurney offers four potential origin stories.
The first, writes McBurney, comes from Harvey W. Thompson’s 1979 book, The Spooners, wherein Thompson recounts that in 1906, a 29-year old Lou Eppinger took a vacation in the wilds of Ontario, where he caught a number of fish on a lure of his own design. Upon his return home, Eppinger continued to work on the lure and once he had it where he wanted it he named it “after the best fisherman I ever saw, soaring high above those northern lakes – the Osprey.” The Osprey would eventually change its name to Dardevle, allegedly in honor of the fierce fighting ability of the Marines against the Germans in the Battle of Belleau Woods in 1918.
The second origin story came from Eppinger himself in 1956. Writing in The History of the Dardevle, Eppinger stated that he spent many years in developing the spoon before finally introducing it in his taxidermy/sporting goods shop in 1917 or 1918. At that time he priced the Osprey at 75¢.
The third story comes from the text of the first print ads that Eppinger ran in Field & Stream in 1919 and 1920. In short, Eppinger discovered that one of his longtime customers had developed a spoon and was, along with his customer’s friends, secretly catching a lot of fish with it. Eppinger bought the rights to the spoon and immediately put it on the market.
The fourth and final version of the story came from Leslie Eppinger, one of Lou’s children. In 1995 a 90-year old Leslie wrote a letter to Karen Eppinger, Lou’s grandniece and the current President of Eppinger Manufacturing Company. When Leslie was 12, in 1917, he said that he went to visit a friend one day. In the backyard of his friend’s house were three or four men standing around a blacksmith’s anvil, hammering a piece of oval-shaped brass. The men told Leslie that they were working on a spoon. Leslie thought it odd that they were making an eating utensil and went about his business.
Jump ahead a couple years when Leslie had a job working in his father Lou’s shop. Lou showed his son the Dardevle spoon which Leslie immediately recognized as the spoon the men were hammering on the anvil in his friend’s backyard. Lou told his son that he had purchased the rights to the spoon from a Mr. Simonsen.
"Cast Out the Devle" lure box insert, c.1920-21. Source: Fishing for History blogsite, article "The Dardevle - Pork Rind Without the Grease" by Bill Sonnett.
Vintage Dardevle and MousieDevle Imp ad. Source unknown. Eppinger also produced metal spoon mousies for bass, complete with bead eyes and squirrel hair tail.
It’s all a little cloudy and vague, but that’s what makes for an interesting origin story, yes? I messaged Jennifer Bustamante, Controller of Eppinger Manufacturing Company and daughter of Karen Eppinger, President of Eppinger Manufacturing. Karen is the daughter of previous President, Ed Eppinger, and Ed was the nephew of Lou Eppinger – so Eppinger Manufacturing is truly a family business, running several generations.
I asked Jennifer which of the stories she believed to be the most accurate, and she replied, “After asking my mother Karen this question, we believe that it was a mix of all of the stories. We believe that Lou did go out and try to create and perfect a spoon, while in the bush, to create the Osprey later to be known as the Dardevle. But we also know that Buel was the first inventor of the spoon itself. We know that Lou did buy the rights to something but there is no documentation of what that spoon was. I wish we had more knowledge as to what actually happened back then but, unfortunately, we don’t.”
Regardless, it’s a great history and story of a supremely successful company. The Dardevle is an all-species lure, no doubt about it. For every fish that swims there’s a Dardevle model, size, and color pattern that will attract and hook that fish. And as the Dardevle initially made its bones as a northern pike lure, it’s impossible to separate the lure from the water wolf in the minds of many anglers. But as Jennifer told me, the Dardevle has seen plenty of success for bass anglers as well.
3/8 ounce Eppinger Osprey Bass Plugs. Source: Terry McBurney article in June 2007 issue of NFLCC Magazine.
Bass catch on Dardevle. Source: Terry McBurney article in June 2007 issue of NFLCC Magazine.
Jennifer says that she’s received “countless stories of bass catches.” I can personally attest to their effectiveness.
I recall fishing with my Dad when I was younger and, often as not, he would cast a Dardevle with either a Crackle Frog or yellow Five-of-Diamonds pattern when fishing for largemouth. Those were his preferred largemouth Dardevle color schemes, with the occasional Black-&-White or Red-&-White patterns to round out his arsenal. It’s little wonder they’ve become my own confidence color patterns for bigmouth bass. For smallmouth I prefer a traditional Dardevle spoon with some yellow or chartreuse, or a ¼- to ½- ounce brass or copper Red Eye Wiggler in Fire Tiger or Five-of-Diamonds pattern.
The Red Eye Wiggler is one of the other lures that Eppinger produces. It is a well-known spoon with two red bead eyes wired into the body of the lure. It was created in 1928 by Rochester, New York dentist and inventor Dr. Frederick Hofschneider. The Red-Eye Lures company was purchased by Eppinger Manufacturing in 1992.
Eppinger sells a number of other fishing lures besides their famous Dardevle spoon. These include, in addition to the Red Eye Wiggler, the Dardevle Klicker, the Rex Spoon, Buzz’N Rex, Spin’N Rex, Devle Dog, Evil Eye, NoTangle Spinners, the Sparkle Tail and more. At one time they even made a series of wood fishing lures, that included the Osprey Pencil Plug, the Little Louis Wobbler and the ⅜ oz. Osprey Bass Plug. If only they’d re-release the Bass Plug! This little beauty was reminiscent of South Bend’s Babe-Oreno. I swear, I alone would account for a good deal of the sales of this wonderful-looking lure. Unfortunately, Jennifer says that the company has no plans, at this time, to re-release any of the vintage lures.
But Dardevles have been such reliable bass lures that Eppinger also purposefully marketed to bass anglers in some of their print ads. Their ads featured a number of fish species, especially northern pike, but they also intermittently highlighted smallmouth and largemouth bass.
And of course we all know how effective the combination of a spoon and pork can be. Early lure box inserts included text ostensibly written by Lou Eppinger that explain the red & white and black & white color schemes: “The white strip represents a pork strip, and the white chunk a chunk of pork, and in addition has a wiggle which cannot be produced with the real article. Neither are you getting yourself all mussed with grease, and the hook being hung on the end of the bait, makes it the deadliest of all baits.” Grease in pork rind baits?
Ed Eppinger manning a Trade Show booth. Source: Dardevle by Eppinger website.
Presently, Eppinger has a “Lure recommendations for Bass” flier on their website. Along with various color patterns for Dardevles and Red Eye Wigglers it also recommends several Buzz’N Rex and Spin’N Rex lures, as well as what appear to be Rex Spoons with rubber skirts.
Jennifer says, “The most common sizes we would use [for bass] are…the 2/5 oz. as well as the ¾ oz. for the northern regions. We also recommend the ¼ oz. as that is one of the most versatile sizes that we sell.”
Bustamante continued with the following unusual account, “I have also heard from customers in Kentucky that they use our large Husky or Husky Jr., which are 3¼ oz. and 2 oz., for bass, and only in the classic Red/White stripe. I’ll never forget the first-time hearing that, I was in complete shock, but these customers swore by it.” The Husky Dardevles are traditionally considered to be big pike and musky lures, so it is, I agree, a little shocking to hear of anglers using them in bass fishing…make that BIG bass fishing.
Eppinger "Lure Recommendations for Bass" flier. Source: Dardevle by Eppinger website.
The Eppinger Dardevle spoon can be fished in any number of ways, depending on situation and conditions, which is one of the reasons it’s been such a longstanding successful lure. For example, you can fish it fast or slow while pretty much maintaining a consistent depth. If you need it to go deep, once it hits the water, count down to the desired depth and start reeling, using either a straight retrieve or a jerk and flutter pattern, alternately jerking and stopping to let the lure flutter down a foot or so. You can speed retrieve it too, keeping it practically on the surface. Like a jerkbait, varying the retrieve can produce impulse strikes. It’s the spoon’s ability to flash and turn during the retrieve without making complete revolutions – revolutions that would otherwise cause line twist – that makes it unique.
The Eppinger Manufacturing Company is located in Dearborn, Michigan. Just this year Karen Eppinger was inducted into the Freshwater Fishing Hall of Fame Karen joining her great-uncle, Ed, and her father, Lou, to become the third generation of the Eppinger family inducted into the Hall of Fame. Eppinger Manufacturing is also one of the few American fishing lure companies to make their lures entirely in the United States. I’ve got a set of Devil Bugs – small hair fly lures used in fly fishing for bass and trout that were once offered by the Eppinger Company – that were hand-tied by Karen Eppinger. They’re treasured keepsakes.
Eppinger storefront. Source: On The Water website article, "Featured Lure: The Dardevle" by John D. Silva.
For well over a century, Eppinger Dardevles have pulled in big bass, northern pike, muskies and just about every fish that swims. At one time, the lure was credited with catching more world record fish than any other bait. But, just like millions of other bass anglers, I’ve got several Dardevles in red & white, crackle frog and black & white in my tackle box. I doubt I’ll hook into a world record, but I know every year that I’ll be holding up at least a few nice bass for the camera thanks to a Dardevle.
Attached to this article are a number of scanned images of a 75th Anniversary edition of the 1981 Eppinger Dardevle catalog. In it you will find their complete lure line-up as it was in 1981, including a number of pages with how-to information for various species. In 1981 Dardevles were making their mark in the Great Lakes with salmon fishing, and there is a special section dedicated to that style of fishing. Other catalogs highlight fishing for other species such as largemouth bass, and if anyone has one of those old catalogs please consider sharing it with Bass Fishing Archives so that we can in turn share it with our readers.
If you want to scroll through the catalog, click on the first image in the gallery below, then use the side arrows to scroll through.


Them Ol’ Brown Fish, Part 2
This piece was originally published on the Bass Fishing Archives site on April 18, 2023.
Billy Westmorland, Them Ol' Brown Fish book cover.
About a year ago, Terry Battisti posted an excellent book review of Billy Westmorland’s Them Ol’ Brown Fish, published in 1976. At the time, I commented on Terry’s article that I should probably find my old copy and give it a new reading. Well, find it I did, and reread it I did as well. It’s been decades since I opened this eccentric little volume on smallmouth bass fishing. So it was with some measure of joy that I found Westmorland’s book to be more quirky and fun than I remembered it.
I guess I’m piggy-backing on Terry’s article here, but that’s okay, because I’m more than happy to reinforce Terry’s declaration that, “From a purely historical standpoint, the book is a must-have.”
For me, as a Midwest kid who grew to love fishing smallmouth on the lakes, rivers and flowages of Wisconsin, Westmorland’s book became my fishing bible. And although I didn’t employ all of his techniques and knowledge, I absolutely cherished his book. It was the only one of its kind, a fishing how-to book devoted entirely to my favorite fish, the smallmouth bass. I read it as a teenager, thinking that I’ll soak up all the know-how in this little volume and I’ll absolutely crush the smallmouth in Wisconsin. And after my dad lost what was close to a state record smallie on the Flambeau Flowage, I just knew that a state record was in reach once I put Westmorland’s tactics into play.
Billy Westmorland, Them Ol' Brown Fish, dust jacket image.
Billy Westmorland, Them Ol' Brown Fish, dust jacket image.
When I say that the book is quirky and eccentric, it’s because it’s rare that you’ll find a book on bass fishing, or any subject for that matter, that is entirely written in the author’s unedited conversational voice. Every page is like a running stream of consciousness chat with Billy Westmorland, complete with all of the brief tangents, memories and reminiscences he would have if he were talking directly to you. It’s as though you and he are sitting in rocking chairs on the front porch, just shooting the breeze, as he recounts stories from his life and how he caught so many smallmouth bass.
Let me give you a taste. On pages 34-35, Westmorland remembers,
“I’m reminded of one time many years ago when I saw this ad in one of the fishing magazines. It didn’t show a picture of the lure, but it described how it was possible to catch all the fish out of any lake–really hurt the population. Underneath it had an affidavit that you signed and mailed in to get these three baits. I believe it was $3.50 for the three of ‘em. Other than just sayin’ it was a fish catcher, it gave no description of the bait or anything.
“Anyway, I signed the affidavit that I would fish it no more than 30 minutes in any lake, pond, or stream, I believe was the way it was. But at the time, I was thinking ‘aha, even though I signed, when I get that bait, I’m gonna really tear ‘em up.’ But I got the baits about 10 days later and they were three bucktail jigs and here I was at that time making jigs by the hundreds. The ones that I sold, I averaged about a dime apiece for ‘em. Three dollars and 50 cents back then was like $30 in this day and time.”
Isn’t that fantastic? This book is essentially a history of Westmorland’s life and of fishing back in the day, told in a colloquial and engaging manner. It’s fun reading, and it must have been fun to have known and conversed with Billy Westmorland. But it’s also more than that. If you pay attention, between his side-track musings you will also glean some darn fine smallmouth bass fishing techniques that will put fish in the boat today.
Terry talked about Westmorland’s preference for fishing small lures on light spinning gear, and of him being one of the early proponents of finesse fishing techniques before they became known as finesse fishing. Also, as Terry alluded, Westmorland will get surprisingly specific with information on the where, when and how of catching smallmouth bass. For example, in the chapter “Big Fish” he says, after talking about the water depth that big smallmouth prefer,
“The depth of the water and the water temperature has more to do with locating these big fish than anything I know of. I really believe water temperature has to be No. 1 in importance. I know I keep going back to water temperature over and over again, but I’m convinced it’s so important, especially in smallmouth fishing. I can’t stress too much the importance of fishing for these fish when the water temperature’s right. I have noticed that with largemouths and some other fish such as walleyes and crappies that the water temperature’s not that critical in fishing for them.
“The ideal temperature for catching smallmouths can be from about 47 to 57 degrees. From 52 to 55 is what I consider the best temp. A difference I’ve found with smallmouths when the water temperature gets from the low 60’s into the 70’s the duration of time in which you can catch the fish feeding up on the banks is a lot shorter. They don’t hang around all day in water temperatures like this whereas they might stay up on the bank all day long when the water is in the 50’s. After the water temperature gets on up there, the bigger fish get harder to catch, too. You just don’t catch that many of them then. These temperatures into the 70’s don’t seem to affect the smaller fish, such as the yearlings, as much as the bigger ones.”
If this doesn’t compel you to bring and use a water thermometer when you’re on the water I don’t know what will. The book is chock full of specific smallmouth fishing insights like this, from specific lures Westmorland preferred, to rods and reels, line, night fishing, the effect of the moon, wave action and water clarity…you name it, Westmorland covers it in his charming, homespun style.
Billy Westmorland, Them Ol' Brown Fish, dust jacket image.
Billy Westmorland, Them Ol' Brown Fish, dust jacket image.
Part autobiography, part smallmouth bass fishing how-to guide, Them Ol’ Brown Fish combines both to paint a picture of the life and fishing philosophy of this great Tennessee angler. Westmorland passed away in 2002. He was only 65 years old. He is rightly inducted into the Bass Fishing Hall of Fame.
Alas, I never achieved catching a state record smallmouth, but I still cherish Westmorland’s book. I wouldn’t sell it for anything, and it holds a special place on my shelf.
I checked a couple of used book resell websites, and Them Ol’ Brown Fish is currently selling for $100 upwards to $400 a copy. That’s quite a mark-up from the $6 I paid years ago. But I will say, if you have a bass fishing history library and you want to complete it, you really do need to acquire a copy of this book. I think you’ll be glad you did.
And if, after reading Battisti’s first piece on Them Ol’ Brown Fish, you want an even more tantalizing and fascinating account of Westmorland’s life and fishing philosophy, by all means check out the excellent episode of The Big Bass Podcast titled “Billy Westmoreland, the Trophy Smallmouth GOAT!.” Terry Battisti and Ken Duke talk about all things Westmorland-related, including the ‘e’ in Billy’s last name and how one day he saved the life of Bass Pro Shops founder Johnny Morris.
KVD’s Secrets of a Champion
This Bass Fishing Archives piece was originally published on April 11, 2023.
KVD's Secrets of a Champion
It’s hard to believe that Kevin VanDam’s Secrets of a Champion was published more than 20 years ago, in 2002. VanDam wrote the book with Louie Stout and at the time he was just a year off from winning his first BassMaster Classic (2001). He would go on to win the crown three more times (2005, 2010, 2011). He would win a total of eight Angler of the Year titles before announcing his retirement from tournament fishing in early 2023. His accomplishments in professional bass fishing are incredible, and it would probably behoove any bass angler to give KVD’s Secrets of a Champion a thorough reading.
This is VanDam’s second book, his first being Bass Strategies: A Handbook for All Anglers, initially published in 1996, although there has since been an updated and revised issue. Secrets of a Champion has slightly less of the mental approach to bass fishing and more of the nuts and bolts of lure modification and presentation, tactics for different conditions, and equipment strategies that even includes boat considerations.
KVD's Secrets of a Champion Hard Baits
VanDam peppers the book with juicy tidbits. For example, in the section on lures he advises using a pliers to crimp a quiet buzzbait rivet to cause it to squeak when retrieved, and he will file the front of a thick crankbait lip so that it will cut through the water more intensely. These are just two of several dozen brief tips VanDam shares for getting the most out of your baits. I’d be surprised if you don’t pull at least a few of the tips from this section and employ them in your own fishing. As they say, it’s the so-called little things that can make all the difference.
In section two, VanDam gives his advice and tips on hook selection, sinkers, jigs, line considerations, rods and reels, and how to get the most from your boat. He even has a page or two on maximizing the battery power in your boat. This, to me, perhaps more than anything else, speaks to VanDam’s success over the years. The man controls everything that he can control that might contribute to his getting a couple more bites.
KVD's Secrets of a Champion Chapter 17.
The final section covers tactics VanDam uses for fishing in the summer, capitalizing on the wind, fishing pressured lakes, and sneaking up on bass. I particularly like his advice on running your trolling motor. Better to run a trolling motor constantly in an area, says VanDam, than to do it in starts and stops, which is more likely to alarm fish. Also, adjust the height of the motor and pick your routes before moving through an area, to lessen the chance of hitting underwater objects and startling bass. It’s just common sense that I’m sure a lot of anglers don’t think about.
This is the shortest section of the book but might be the most fun reading because it also includes practically an hour by hour account of how VanDam won his first BassMaster Classic. You really get an insight into the mind of a champion bass fisherman here and the pressures that go along with fishing at that level. It’s great stuff!
KVD’s Secrets of a Champion is a relatively short how-to volume that’s loaded with extremely easy-to-digest tips and techniques that will surely help any bass angler improve his or her odds on the water, even if you just employ a couple of his suggestions. The writing is simple, straight-forward and engaging. This book would be a welcome addition to any modern angler’s library, and I predict you’ll return to it more than once.
Wolverine DuraShocks SR 6” Work Boot
After a hit and a miss I found a tough, comfortable, good-looking boot that I really like.
I hate to admit this, but over the last few years I’ve had some trouble with my feet. I really don’t know what the problem is, other than that I occasionally have a flare-up of gout, but my feet have been “iffy” more times than I care to admit. This is something that I’ve had a hard times accepting, because I’ve always been good on my feet, agile and athletic, but lately my feet (and my knees…bone spurs) have been giving me more grief than anything. Often, they hurt when I walk and I’ve taken to changing my diet (for the gout) and massaging them to keep them pain-free and manageable. As a result, it’s become hard to find a pair of shoes and boots that I’m comfortable with. I always buy those cushioned inserts when I get a new pair of running shoes or boots.
Well, several months ago I was approached by someone who works with Wolverine Boots, out of Rockford, Michigan. They asked if I’d like to try a pair of new Wolverine boots. Actually, they asked me to try several pair. The first pair I tried I loved for their stylish look. They were the Rancher Flag Work Boot (I reviewed them back in August). They were/are good boots, ones I still wear when I go out or want to look a little more well dressed. I have found, however, that extended wear tends to bother my feet just a little bit more than I originally thought. After the Rancher Flag boots I got a pair of ReForce EnergyBound Composite Toe Work Boots, and these I found to be quite uncomfortable. Finally, they sent me a pair of Wolverine DuraShocks SR 6” Soft Toe Work Boots, and I’ve been wearing them almost daily since breaking them in in the beginning of November. I think I’ve found a boot that works!
My experience with the three pairs of Wolverine boots - one pretty good, one unfavorable, and one excellent - just goes to show you that fitting boots or shoes can be a very personal experience, and that you might have to try several before finding the one that feels good, especially if you’ve got issues with your feet.
The DuraShocks SR boots have been comfortable, they look great and my feet feel absolutely no ill effects after continuous wear. And get this, I don’t even have cushioned inserts in them. That’s huge for me. I can walk continuously for extended periods of time and the only issue I have is that I occasionally have to tighten up the shoestrings. These boots have become my everyday, comfortable and reliable work boot. I do a good deal of stomping through the woods, over trails, up and down hilly terrain and just taking daily walks with my wife. These boots have been a godsend. But I will admit that sometimes, infrequently, after a full day of walking my dogs do start to bark. That might say more about the health of my feet than the boots, I don’t know. But I’m grateful that the barking isn’t an everyday thing anymore.


Wolverine Durashocks SR’s appear to be very well made, and after two months of regular wear they show darn little wear and tear. Sure, they’re scuffed up a bit and have a few wrinkles, but I imagine they’ll hold up fine for a good while. At this point I expect them to last well past this coming year, but we’ll see. I have yet to oil them up and the tread is still in excellent condition. And as for the tread, it’s advertised as slip resistant. Just this morning we had icy conditions and I can confirm that I safely navigated our ice covered porch. lol. As far as their water resistant leather upper, that too is accurate, and as I said, I have yet to oil them, which will of course completely waterproof them. Overall, I really, really like these boots. They’ve pretty much solved an ongoing issue I’ve had, are very comfortable, sturdy and well crafted.
Note: I just checked the website to check the selling price for this review. They sell for $160. But I was surprised and happy to see that the boot was also named “GearJunkie's Most Comfortable Work Boot of 2024.” That’s an accolade that I fully confirm. Darn good boot!
Here’s a video promoting the Wolverine DuraShocks SR Work Boot:
Tom Mann’s Methods For Catching Bass
First published on Bass Fishing Archives on Jan. 17, 2023.
Tom Mann's Methods For Catching Bass.
Tom Mann’s Methods For Catching Bass is a 1972 B.A.S.S. publication that is truly a product of its time. Mann, of course, is one of the most successful lure designers who’s ever lived, with a minnow bucket overflowing with bass catching baits that have become iconic. He was also a highly successful tournament angler, winning the 1971 Georgia Invitational on Lake Seminole and the 1972 Florida National on Lake Kissimmee. Mann qualified for 7 BassMaster Classics and placed 2nd in the very first one on Lake Mead in 1971. In this book he basically wears both hats, lure designer and successful bass angler, writing about a few of his best-known lures and how to fish them, as well as giving anglers solid advice on how to find and catch bass in multiple situations and conditions.
The book lists Mann as the author and Bob Cobb as the editor. But Cobb used a very light hand in editing. The grammar and spelling are occasionally suspect but the 112 page softcover is heavy on folksy charm and pre-modern-electronics bass fishing wisdom. This book is written in Mann’s own words, and it’s all the better for it. The first chapter is titled “Tom Mann’s Philosophy for Bass Fishing,” but there’s really very little bass fishing philosophy here. It’s more a story of Mann’s life growing up on a farm in rural Alabama, and how fishing fit into that life. To me, this story is much more interesting than his fishing philosophy, and really sets the tone for the rest of the book.


I don’t suppose you could expect a lure designer of Mann’s stature to put out a book on how to catch bass without him giving a heavy nod to a few of his own lures. The first half of Methods For Catching Bass spotlights probably his best known lures at the time of publication, each meriting a chapter of its own: the Jelly Worm, Little George, Wooly Bully spinnerbait, and the Mann-O-Lure. In each chapter, Mann discusses the virtues of the bait and how to fish it in various conditions. It’s a great general tutorial on fishing each lure style and the environments for which each one is best suited.
It’s also interesting to note that Mann favored spinning gear over baitcasting gear. He mentioned it more than once throughout the book, while almost ignoring baitcasting gear altogether. He gives his recommendations for the spinning gear set-up he feels is best, and says that, in his opinion, “heavy-duty open-face spinning tackle has the edge over other bass fishing outfits.” Mann’s preference for spinning rods and reels is manna to my ears, as I grew up fishing spinning gear and only came to baitcasting later in life. It’s reassuring to know that one of the world’s best bass anglers bucked the trend a bit by favoring it over the baitcasting gear preferred by most pro anglers.


In the succeeding chapter, “Learn to Think Like a Bass,” Mann discusses topics like bass vision and hearing, feeding habits, living areas, whether bass react to human odors, and even a couple paragraphs on keeping bass for eating. These are all potentially dry topics that have been covered by many other authors, but Mann addresses them with interesting anecdotes and an engaging style that makes for some good reading.
One interesting bit from this chapter comes when Mann talks about odors that repel or attract bass, or scents that serve to cover human odors. “At the 1972 Arkansas National BASS Tournament on Lake Ouachita, one contestant aroused considerable interest by juicing his artificial plastic worms with a well-known spray deodorant, Mennen. The angler swore it made the difference in the number of strikes. Asked about the effectiveness of such tricks, the pro’s fishing partner grinned, ‘I don’t know whether it really helps or not, but I’m afraid not to try it too.’”
This reminds me of a popular “scent” folks fishing for Lake Michigan salmon and trout used to apply to their lures back in the day: WD40. I don’t know who started it, but WD40 as a fishing scent took off like crazy along the lake shore, with everyone from charter captains to pier anglers having cans of it in their gear. You bet we used it too, although I can’t say with certainty whether it increased the hits we got or not. Like Mann alluded, we were afraid not to try it for fear of missing out on something hot.
Tom Mann, Methods For Catching Bass, p.112.
In one of the editing quirks in the book, the next chapter is titled “How to Find Bass” in the table of contents and in the running head (or top) of each page of the chapter. But the big font title at the start of the chapter repeats the book title with “Tom Mann’s Methods for Catching Bass.” This slight confusion really means, I assume, that this is the “money chapter.” I think that would be a good bet, because Mann subscribes to the old adage that says finding a bass’ lair is job number one. This portion of the book covers where to look for bass and how to develop a pattern for catching them once they’re found. Pattern fishing and structure fishing are well-known tactics today, but in 1972 they were still fairly new to many anglers. Pro anglers like Tom Mann and Roland Martin, and magazines like Fishing Facts and, later, In-Fisherman, have made it the ubiquitous fishing method that every serious angler employs today.
So you might look at this section to be something of a primer on pattern and structure fishing, as well as presenting a way of fishing that has all but disappeared in modern tournament angling. Mann discusses using dry-land terrain to suss out the potential underwater features, using land markers (trees or houses, for example) to triangulate a hot spot on the water, along with a depth sounder and marker buoys to further pinpoint those spots. Of course Mann has high praise for his own Humminbird Depth Sounder in this pursuit. It’s really a great record of how bass fishing used to be before the advent of modern electronics, forward facing sonar, livescope and luxury bass boats equipped with everything but espresso machines. This is how the pros of old did it, and it’s still a highly effective method for non-pro anglers who aren’t blessed with truckloads of money or sponsorships. It’s also the real history of bass fishing that those of us who follow Bass Fishing Archives love, back when the tools and techniques of professional anglers were within easy reach of weekend anglers.
Tom Mann and David Lockhart with an incredible string of bass. Methods For Catching Bass, p.109.
Mann concludes the book with a brief chapter called “Putting It All Together.” He provides a quick bullet list of “Deadly Dozen Tips for Catching Bass” that is, in my opinion, just fantastic common sense advice. And he tells a wonderful story of how he and friend David Lockhart did indeed put it all together one July day in 1972 and boated an unbelievable 25 bass weighing 155 pounds total. Mann continues, “The top 17 weighed 128 pounds; an amazing seven-plus pound average. David’s big bass was so fat it was shaped like a saucer. The fish was 26 inches long with a 25-inch girth.” The picture of Mann and Lockhart with this incredible catch is mind-blowing. In fact the photos alone in this great little book are worth the price of it, in my opinion.
So, notwithstanding the few editing miscues, this is a book every angler who enjoys bass fishing history and its colorful personalities should own. Tom Mann is a legitimate legend in the sport and “Methods For Catching Bass” is all the more engaging because it’s written in his own words. You can still find the book available in a few online sources for under $20.
Evergreen Ammo Case and GoPro Case
A couple of brilliant storage cases you didn’t know you needed.


I acquired two new high quality storage cases, one for ammo and one for my GoPro, from Evergreen Cases, back in October. Up until now I had been storing my ammo in its original cardboard boxes in either a heavy cardboard box or in one of the old metal military ammo boxes I inherited. It was a system that, for the most part, worked for me, although I have to admit it was a bit of a hassle sorting through the boxes in my closet for whatever cartridge I happened to be looking for. More often than not, it seemed that if I was looking for, say, 9mm cartridges I’d have to pull out a dozen other boxes before finding what I was looking for. Yes, I know, I should be more organized, but sometimes life gets in the way and you end up settling on a storage system just because it’s in front of you.
Anyway, I decided to change my lackadaisical ways this year and am determined to get more organized. To that end I got a couple of these new cases from Evergreen, just to try them out and see if they would be worth pursuing as a more permanent system. Suffice to say, I am impressed with both of the cases I got from Evergreen. They are both beautifully designed and appear to be on the upper end of the sturdy and rugged scale. They share a 3X Key Lock Latch, which I found to be a nice feature to keep prying little hands from getting into the contents. Not that I have any prying little hands around much anymore, but occasionally when the kids visit it’s nice to have that little added bit of security.
What I really liked about the ammo case was the ease and style with which it fit in a dresser drawer. I appreciate the fact that all of my ammo is neatly organized in a form-fitted case that I can easily transport, rather than a “box of shells” that rattles about when I need to grab it or move it. I’m telling you, I just feel more professional about my ammo storage now. So much so, in fact, that I’m going to expand my collection of cases to include a few handgun storage cases as well. If I have a criticism of the Evergreen Case it would be that they’re not stackable. I would really like to see the company incorporate a design that allows for cases of the same size to snap into place with one another.
But as much as I like the Evergreen 56 Pistol Ammo Case, I like the 56 GoPro Case even more. This thing solved several issues I had with storing my GoPro. It is super handy and convenient to have every piece that goes with my camera in a single, form-fitted case. I got the clear top case, which allows me to see everything I’m carrying. Man, it beats hauling everything in a zippered bag by a country mile. Plus, the case is waterproof, shatterproof and has the same 3X Key Lock Latch, so it by no means can accidentally open without you twisting the latch or using the key if you choose to. The ammo case makes me feel good about my firearm and ammo storage options now, but the GoPro Case is life changing. I don’t mean to sound overly dramatic but if you have a GoPro or similar small motion camera this kind of storage is just invaluable.


Evergreen has some cool options too, if you’re so inclined. I believe you can get custom printing done on the cases, and they have custom foam inserts as well. I’m planning on changing out a lot of my storage systems this coming year and replacing them with Evergreen Cases. My next cases will be their Medical Kits, the 56 model for backpacking and day trips and the larger 230 or 300 case for the truck and lengthier camping or backcountry trips.
Evergreen Cases are pretty affordable, with the two I got running around $38 for the ammo case and $50 for the GoPro case. But Evergreen seems to have sales going on fairly regularly, and right now they have some great deals going on for the holidays. I think just about any of the cases would make a great Christmas gift, especially the GoPro case and the Med Kit (I’m getting a Med Kit for my brother, and another GoPro Case for myself). Do yourself a favor and check out the Evergreen Cases website.
Rocky Talkie 5 Watt Radio Set
Rocky Talkie is a wonderful safety tool that allows you to stay in touch when you’re on the lake or in the field.


I’ve long wanted a set of walkie talkie radios, as a safety and security tool when I’m away from home. I hunt and fish by myself almost exclusively, and there have been times when I’m in the woods or on a lake and my cell phone service has not been reliable. I live in northern Wisconsin and as I drive around the state I inevitably hit spots where I simply can’t get a phone signal. I’ve long thought that a set of two-way radios would solve this issue. The Rocky Talkie 5 Watt Radio set has indeed done just that. Beyond being able to contact my wife should I have an emergency situation, just being able to chat is a huge convenience with the Rocky Talkies.
I started out using them a few times this fall when I was in the boat fishing. The lake I frequent is a short distance - less than 2 miles - away from home, which is well under the radio’s stated 35 mile line-of-sight range. I thought these outings would allow my wife and I to familiarize ourselves with their use and features, and would hopefully be fun to use as well. Of course they worked beautifully. There’s a video that runs through the features and operation of the Rocky Talkie, and I’ll include a link to it below. But honestly, it took us less than 60 seconds to get in the groove of how to use them. The system is intuitive and super simple. And the clarity of transmission is shockingly good. Voices come through crisp and clear, and we experienced no static whatsoever.
The Rocky Talkie handles like a sturdy, high quality unit. It feels good in the hand and the components seem practically bomb proof. I especially like the springy cord carabiner hook-up, which allows me to attach it to a belt, shoulder or pack loop, and stretch it up to talk while maintaining connection to the carabiner harness. It’s the little things like the carabiner attachment that make a big difference.
As we moved into November I strayed a little further from home for hunting and a couple final fishing trips. At around 8 to 10 miles the walkies still worked great, with no significant drop in sound quality or clarity. Now bear in mind that the area I was hunting and the distance from home is fairly flat or gently rolling land. I don’t know what the reception would be in mountainous terrain. One time I was out and it was raining, and my unit got wet from the rain. It functioned just as it had before it got wet. The specs indicate that the Rocky Talkie is waterproof to about 3 feet if submerged. I don’t know about that, but I’m guessing it’s probably accurate based on how the unit performed in a steady rain. One of the most impressive features, in my opinion, is the battery life. Battery life is just nuts, lasting several days, with moderate use, before recharging. That is peace of mind right there!
Another nice thing about the 5 Watt radio is that it’s really quite simple, and doesn’t have a lot of unnecessary features. It’s basically idiot-proof. The weather channel feature is pretty sweet too, giving you plenty of advance notice of impending weather conditions. You also have the option of replacing the regular antennae with a longer 17cm antennae, which comes with the unit, should you need to improve reception. I didn’t need to, as I have yet to venture more than 10 or 12 miles from home, but I’m sure it will come in handy as I increase my hunting distance from home. I think the real utility of these units, however, will be when hunting or fishing and camping in the backcountry, and you want to stay connected to your base camp or camp site while out in the field or on the lake. In that regard, I see the Rocky Talkie as practically indispensible.
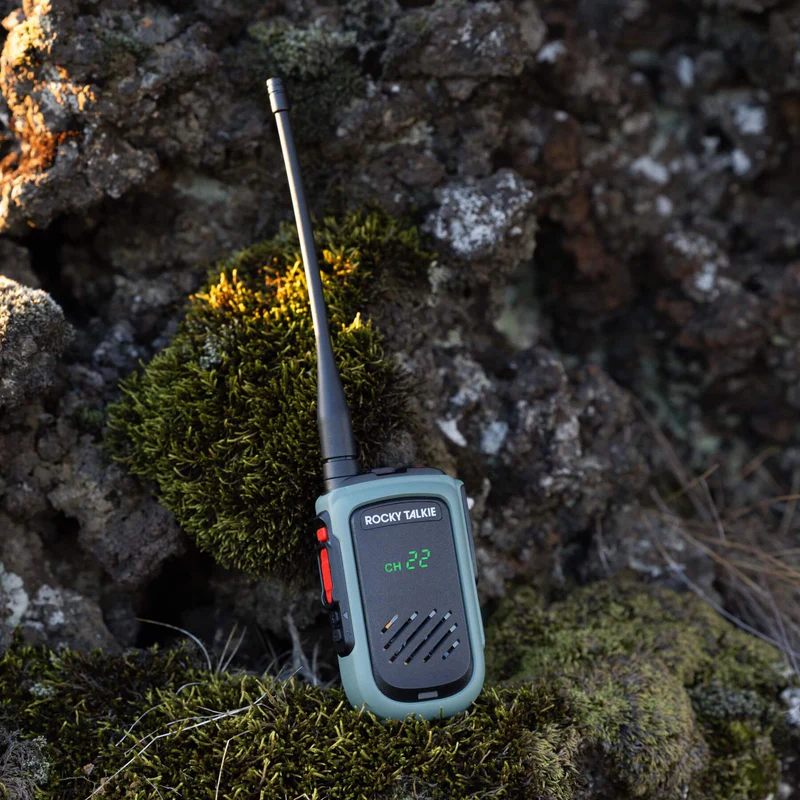
The Rocky Talkie 5 Watt Radio with the extended antennae attached.