Sucker fishing - pickled fish & roe
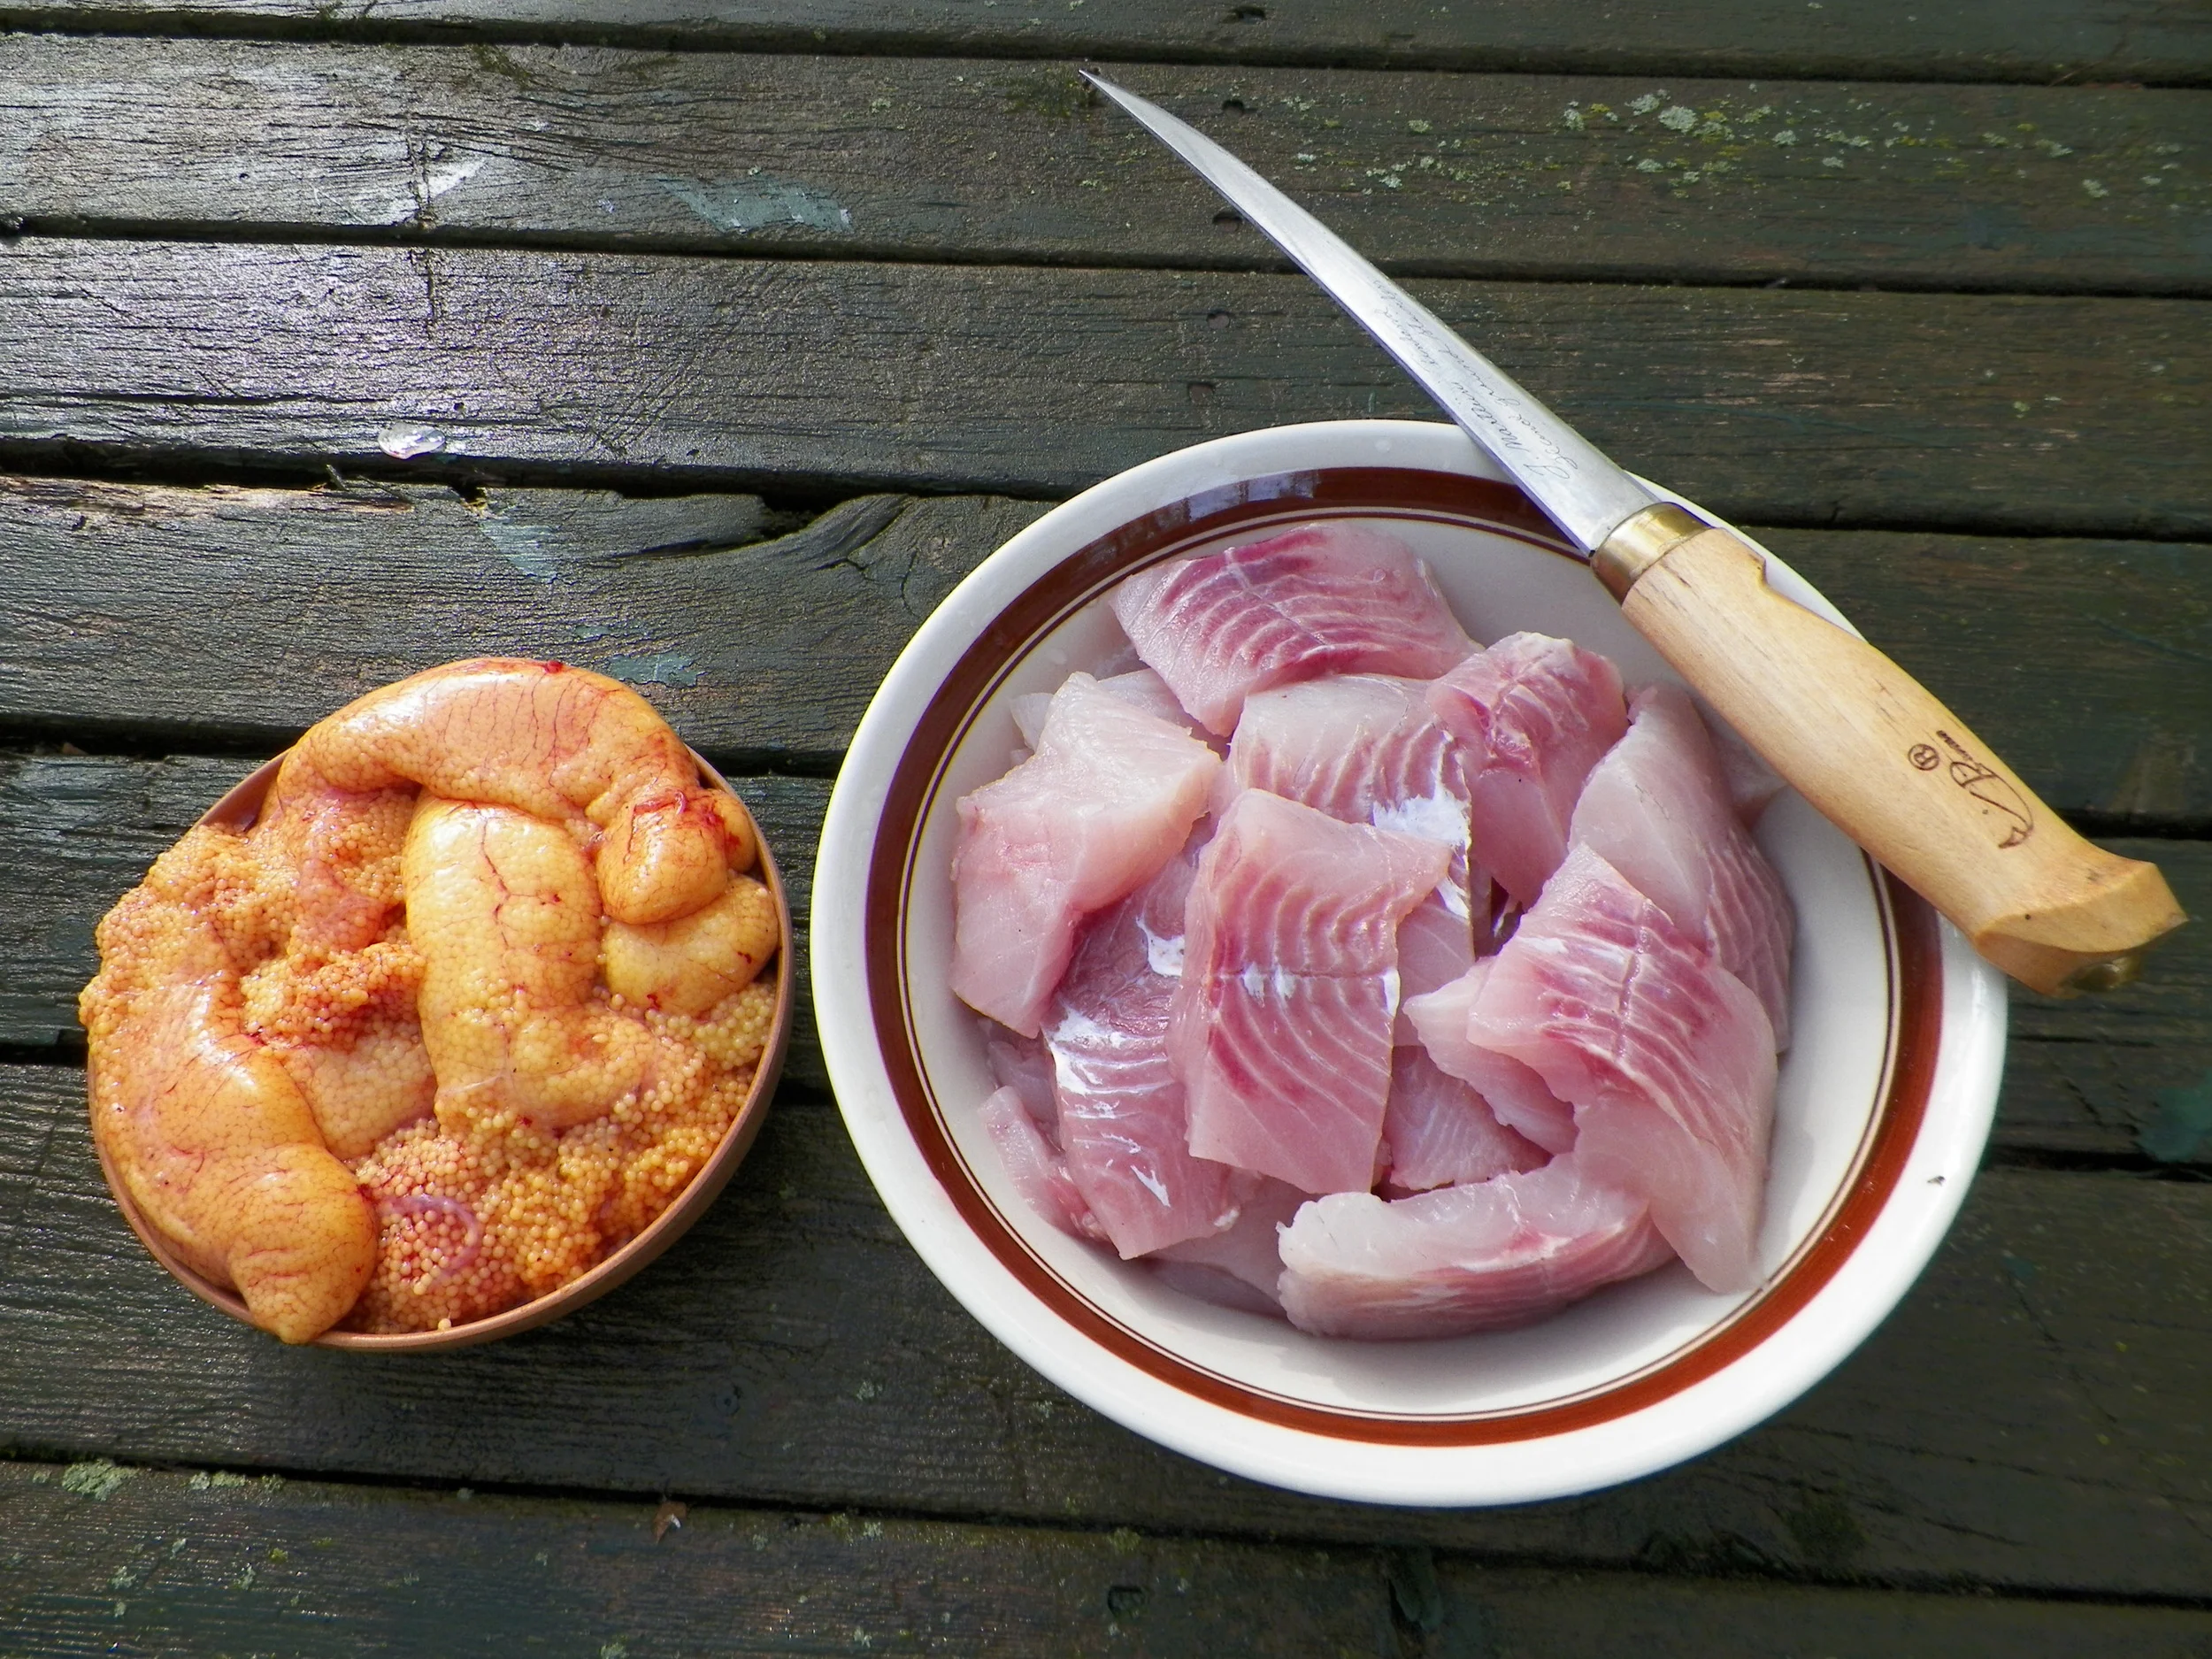
My Dad and I went down to one of the spots on the Wolf River, next to the Shawano Dam, where we have always had good luck with panfish and bass. This day the suckers were in and spawning, and foiled our plans for bluegills. We decided to have some fun with the suckers anyway. We kept three for pickling.

They were each filled with roe, which I like sauteed in oil & butter, with onions and bacon, for breakfast. This batch of roe, however, I brined and pickled with what was left of the pickling juice I used for the fillets (they'll cook up much the same, but with a different flavor).
The recipe for pickled suckers is simple, and is basically the same recipe I use for any number of fish species, such as small northerns or bullheads. I don't pickle a lot of fish, because I much prefer my fish pan fried, baked, or broiled in foil over a campfire, but it is nice to have a few jars of pickled fish around for when the mood hits or when we just want a quick snack to go with a cold beer on a summer evening.
Ingredients:
- Kosher salt
- 2 cups distilled white vinegar
- 1 cup white wine (I used some of our apple wine)
- 1 cup brown sugar
- couple tablespoons of pickling spice
- sliced onion and a few small Thai or chili peppers
After cutting your fillets into chunks a couple inches wide let them soak in a brine solution of water and kosher salt (I use around 1/4 cup of salt for 4-5 cups water, but I admit I'm not real fastidious about measuring...it's more of an eye-balling and taste thing...). Let the fillet chunks soak for 1 to 3 days. I let these soak for only one day. Some folks say let your fish soak in the brine for 5 days, but I've never done that.
After they're finished brining, rinse them THOROUGHLY in cold running water for several minutes. Let them sit in cold water for several more minutes and then rinse them again. They should be pretty well saturated with the salt brine, which hardens them up quite a bit, but you don't want them to taste too salty, so a good, extended rinsing is in order.
While you're rinsing the fish boil the vinegar, wine, spice, peppers and brown sugar for a few minutes until everything dissolves (keep stirring it as it boils). Pack some sterilized canning jars with the fish chunks and onions, and pour the pickling brine over the top. Use a butter knife at the inside of the jar to allow pickling brine and spices to flow into the entire jar and remove some of the air pockets. Wipe the rims, put the lids on and screw on the bands. Date the lids and set the jars in your fridge for a few days to let the fish and pickling brine get better acquainted.

For this particular batch of roe I made a less salty brine and soaked the eggs in that for a few minutes, packed them into a jar along with a few sliced onion halves and then added the pickling juice (strained to remove the spices) to fill. These won't last long as I'll probably have them for breakfast over the coming week, mixed in with omelets or scrambled eggs.

Sucker roe with onions.
For anyone wondering, sucker roe is much more mild than the salmon roe I cured a couple months ago. It has a very subtle, gentle flavor.

Dad with a couple of large suckers.
Pretty pickled ramps for tonight's Foodie Potluck
I seem to be saying this a lot lately but I am just flabbergasted that it has been nine full days since I las updated the blog. Seems like just three or four days ago. How can these days be going by so quickly?! I suppose it's because I've been generally going full bore from early morning until bed time lately, trying to get as many tasks accomplished in the yard and house before I start work at the new restaurant that will be opening soon in town (more to come on that).
Our Foodie Potluck gang is meeting tonight and this month's theme is Earth Day. A few folks expressed interest in the pickled ramps I posted last week so yesterday I pickled a bunch that I had harvested earlier in the day to bring to tonight's potluck.

Kim holding a couple nice bunches of cleaned and trimmed ramps about to be pickled.

Jeez, another pickled ramp recipe?
Ramps do appear to be this year's trendy food. There also seem to be a lot of pickled ramp recipes floating about lately. Allow me to add my own tried and true ramp pickling recipe to the mix. It's one that I really like to use with ramps especially, because I think the end product is a little unusual. The ramps look cool when you plate them and their flavor is a bit exotic.
One of the fun things about pickling is that it's such a simple process, but it also allows plenty of room to play with ingredients to create something all your own. I have a few different pickling recipes and two that I specifically use with ramps: one is a recipe I use for making ramps destined to be Bloody Mary or Martini garnishes, and the other is for ramps to be eaten as part of a meal. This is my recipe for the latter; I call it Curried Pickled Ramps.
Ingredients to make 1 pint of Curried Pickled Ramps:
- 1 cup white vinegar
- 3/4 cup sugar
- 2 tbl honey
- 2 tbl pickling spice *
- 1 tbl Kosher salt
- 1 tsp turmeric
- 1 heaping tsp curry powder
- 1 tsp fennel seed
- 1/2 tsp celery seed
- 1 heaping tsp smoked salt *
- pinky finger-sized piece of raw, peeled ginger
- couple of small Thai peppers (I used dried Thai peppers with today's batch)
- enough ramps to fill a wide mouth mason pint jar. maybe 1 1/2 lb bunch, cut at the stem so that they fit into the jar vertically

Pickling ingredients ready to go.
1. Wash and sterilize one or two wide mouth mason jars, their lids and bands. Sterilize by setting them in a pot of water to cover and bring it to a boil. After they've boiled for a few minutes set them out on a clean towel to dry.
2. Boil enough water to immerse the ramps in and set up another bowl with cold water and ice cubes. As soon as the water is boiling put the ramps in for about 30 seconds (it's a mighty quick bath to soften them up). As soon as that 30 seconds is up pull them out of the boiling water with a set of salad tongs and plunge them into the ice bath. Let them sit in the ice water until you're finished with the pickling solution.
3. Add the vinegar and all of the other ingredients except for the ginger and Thai peppers to a pot and bring it to a boil, stirring to dissolve the sugar and salt, and mixing everything else real well. Let it boil (keep stirring) for a minute or two.
4. Remove the ramps from the ice bath and stuff them bulb end down into the jar. Place the piece of ginger and the Thai peppers into the jar with the ramps (I place them on the outside edge so they are visible, for no other reason than because I like the way it looks). If the ramps are taller than the height of the jar you can take a scissors and cut them down while they're still in the jar, or bend them into the jar.
5. Pour the hot pickling solution into a Pyrex measuring pitcher (I use a 2-cup pitcher) so that it's easier and less messy pouring the solution into the mason jar. Pour the pickling solution into the jar of ramps, separating them a bit with a butter knife as you slowly pour so that the seeds and spices mix in well amongst the ramps.
6. Wipe the edge of the jar with a clean towel or wash-cloth and seal with the lid and band. That's it! Now let them sit for at least a day to soak up all that good pickling flavor and color. Most refrigerator style pickling recipes say that you ought to use them up within a week or so, and that's probably worthwhile advice, but I've eaten refrigerator pickles (ramps, cukes, tomatoes, squash, radishes, etc) that have been in my fridge for months and they've always been good. But that's me.
* A word on pickling spice: You can get ready-made pickling spice almost anywhere, or you can make it yourself. There are any number of easily found recipes for it and it is kind of cool to tailor make your own pickling spice. I have come to like a pre-made pickling spice I get from a small Amish country store in north-central Wisconsin. It contains mustard seed, allspice, coriander, cassia, ginger, peppers, cloves, bay leaves and a few other spices. It's got a richer, more clovey, liqueur-like aroma, to my nose, than other pickling spices I've tried.
* I normally don't use smoked salt like I did with this particular batch, but I acquired a jar of wickedly strong smoked salt from my friend Dixie a few weeks ago and have been using it where the opportunity seems appropriate. I only put a teaspoon of it into this mix but didn't really notice it in the final product. So, I think with the next batch I may up that amount to a full tablespoon and see what happens.
These Curried Pickled Ramps are delicious, if I do say so myself. They make a fantastic garnish or a side vegetable all by themselves (as you see in the photo of today's lunch). I've also used them to great effect in sandwiches. They have a great Middle Eastern flavor from the curry, and they look beautiful, with the turmeric and curry turning them to a bright neon-y yellow.

Curried Pickled Ramps...mighty good eating.
After I pickled the bulbs and stalks I had a lot of ramp leaves left over. So, I decided to pickle some of those as well. This time I used the same pickling recipe but left out the turmeric, curry, ginger and smoked salt. I didn't blanch the leaves either, but rather stacked several upon one another and then rolled them into three separate, tight little bundles (see images). I stuffed the bundles into the mason jar and poured the hot pickling solution over them, sealed it up and placed it in the fridge. I'm not sure what I'll do with them yet, but I'm thinking that they will probably be great on sandwiches, chopped up in a salad, as part of a rice or pasta dish, wrapped around some cheese, or any number of other possibilities. I'll let you know how they turn out.


Two images above: rolling ramp leaves before pickling.

Pickled ramp leaves and Curried Pickled Ramps.
After that jar of pickled ramp leaves I still had plenty of them left over, so I made a couple jars of pesto with them, following the recipe for ramp pesto I posted a couple weeks ago.

Two jars of ramp leaf pesto. Gave one to friend Kim Geiser.
Finally, I had maybe a dozen leaves left and, not wanting to waste anything, I tore them up and took them out to the ducks to see if they'd eat them. The ducks didn't seem very interested in the ramp leaves, only nibbling at a few. But later when I checked on them I noticed that there were no ramp leaves on the floor of the enclosure, so maybe they enjoyed them after all.
Pickled Eggs
We're planning on entering the urban chicken farming arena this spring and I've got a couple of small egg layers, possibly even a couple of quail, on my wish list just so that I can do some fun culinary things with little eggs. I've always liked good pickled eggs ("good" being those that don't taste solely of vinegar but rather have a nice depth of flavor from spices and other ingredients) and the image of a big jar full of brining quail eggs is sure to look fantastic and would make a great garnish for my famous Bloody Mary (famous to a few people anyway) or a martini.
 I pickled some eggs this morning (shown above) and here's the simple recipe.
Ingredients:
- 3 cups apple cider vinegar
- 2 tablespoons pickling spice mix
- 3 tablespoons sugar
- 2 teaspoons sea or Kosher salt
- 1 tablespoon hot Thai or cayenne pepper salt
- dash of red pepper flakes
- 1/2 small onion, roughly chunked
- 4-5 garlic cloves, slightly smashed to open them up a bit
- couple teaspoons brandy.
- 12-18 regular-sized eggs
- 1 big jar with lid
- Add the sugar and other spices to the vinegar and simmer for 5 minutes.
- Hard boil the eggs and peel.
- Add the peeled eggs to the jar, interspersing with the garlic and onion.
- Pour the pickling liquid over the eggs and then add the brandy to top it off.
- Close the lid and let it sit in the fridge for a week or so.
That's it, easy as pie.